Compare
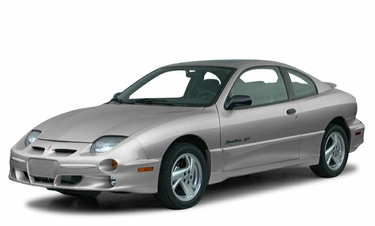
$14,250
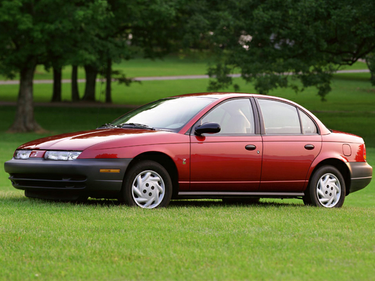
$10,595
Hide similarities

Highlights
|
$14,250
Starting MSRP
|
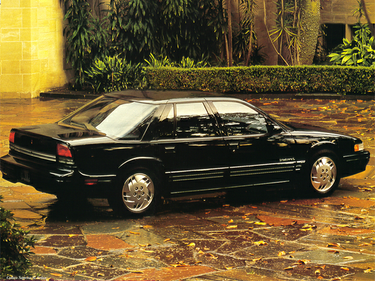
$16,670
Starting MSRP
|
$10,595
Starting MSRP
|
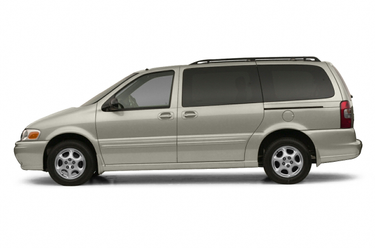
$26,995
Starting MSRP
|
|
Gas L4
Engine Type
|
-
Engine Type
|
Gas L4
Engine Type
|
Gas V6
Engine Type
|
|
23 City / 29 Hwy
MPG
|
-
MPG
|
29 City / 40 Hwy
MPG
|
19 City / 26 Hwy
MPG
|
|
115 hp
150 hp Horsepower
|
-
Horsepower
|
100 hp
Horsepower
|
185 hp
Horsepower
|
|
Front Wheel Drive
Drive Type
|
Drive Type
|
Front Wheel Drive
Drive Type
|
Front Wheel Drive
Drive Type
|
|
5
Seating Capacity
|
-
Seating Capacity
|
5
Seating Capacity
|
7
Seating Capacity
|
|
3 yr / 36,000 mi
Basic Warranty
|
-
Basic Warranty
|
3 yr / 36,000 mi
Basic Warranty
|
5 yr / 60,000 mi
Basic Warranty
|
Engine
|
2.2L/134
Displacement
|
-
Displacement
|
1.9L/116
Displacement
|
3.4L/207
Displacement
|
|
115 @ 5000
SAE Net Horsepower @ RPM
|
-
SAE Net Horsepower @ RPM
|
100 @ 5000
SAE Net Horsepower @ RPM
|
185 @ 5200
SAE Net Horsepower @ RPM
|
|
135 @ 3600
SAE Net Torque @ RPM
|
-
SAE Net Torque @ RPM
|
114 @ 2400
SAE Net Torque @ RPM
|
210 @ 4000
SAE Net Torque @ RPM
|
|
Gas L4
Engine Type
|
-
Engine Type
|
Gas L4
Engine Type
|
Gas V6
Engine Type
|
|
M/T
A/T 5-Speed M/T 4-Speed A/T Transmission Options
|
A/T
4-Speed A/T Transmission Options
|
M/T
5-Speed M/T Transmission Options
|
A/T
4-Speed A/T Transmission Options
|
|
23 City / 29 Hwy
MPG
|
-
MPG
|
29 City / 40 Hwy
MPG
|
19 City / 26 Hwy
MPG
|
|
9.6 qts
Total Cooling System Capacity
|
-
Total Cooling System Capacity
|
7.1 qts
Total Cooling System Capacity
|
10.7 qts
Total Cooling System Capacity
|
Tires & Wheels
|
P195/70R14
Rear Tire Size
|
-
Rear Tire Size
|
P175/70R14
Rear Tire Size
|
P215/70R15
Rear Tire Size
|
|
P195/70R14
Front Tire Size
|
-
Front Tire Size
|
P175/70R14
Front Tire Size
|
P215/70R15
Front Tire Size
|
|
T115/70D14
Spare Tire Size
|
-
Spare Tire Size
|
T115/70R14
Spare Tire Size
|
T125/70R15
Spare Tire Size
|
|
14 x 6 in
Front Wheel Size
|
-
Front Wheel Size
|
14 x 5 in
Front Wheel Size
|
15 x 6 in
Front Wheel Size
|
|
N/A
Spare Wheel Material
|
-
Spare Wheel Material
|
Steel
Spare Wheel Material
|
Steel
Spare Wheel Material
|
|
14 x 6 in
Rear Wheel Size
|
-
Rear Wheel Size
|
14 x 5 in
Rear Wheel Size
|
15 x 6 in
Rear Wheel Size
|
|
Steel
Rear Wheel Material
|
-
Rear Wheel Material
|
Steel
Rear Wheel Material
|
Steel
Rear Wheel Material
|
|
Steel
Front Wheel Material
|
-
Front Wheel Material
|
Steel
Front Wheel Material
|
Steel
Front Wheel Material
|
|
14 x 4 in
Spare Wheel Size
|
-
Spare Wheel Size
|
14 x 4 in
Spare Wheel Size
|
15 x 4 in
Spare Wheel Size
|
Suspension
|
Trailing Arm
Suspension Type - Rear
|
-
Suspension Type - Rear
|
1ndep. Tri-Link
Suspension Type - Rear
|
MacPherson Strut
Suspension Type - Rear
|
|
MacPherson Strut
Suspension Type - Front
|
-
Suspension Type - Front
|
MacPherson Strut
Suspension Type - Front
|
MacPherson Strut
Suspension Type - Front
|
|
w/Coil Springs
Suspension Type - Front (Cont.)
|
-
Suspension Type - Front (Cont.)
|
w/Stabilizer Bar
Suspension Type - Front (Cont.)
|
w/Coil Springs
Suspension Type - Front (Cont.)
|
|
w/Coil Springs
Suspension Type - Rear (Cont.)
|
-
Suspension Type - Rear (Cont.)
|
Not Available
Suspension Type - Rear (Cont.)
|
Twist Axle
Suspension Type - Rear (Cont.)
|
Steering
|
3
Lock to Lock Turns (Steering)
|
-
Lock to Lock Turns (Steering)
|
4
Lock to Lock Turns (Steering)
|
3
Lock to Lock Turns (Steering)
|
|
36 ft
Turning Diameter - Curb to Curb
|
-
Turning Diameter - Curb to Curb
|
37 ft
Turning Diameter - Curb to Curb
|
40 ft
Turning Diameter - Curb to Curb
|
|
Pwr Rack & Pinion
Steering Type
|
-
Steering Type
|
Manual Rack & Pinion
Steering Type
|
Pwr Rack & Pinion
Steering Type
|
|
N/A
Turning Diameter - Wall to Wall
|
-
Turning Diameter - Wall to Wall
|
40 ft
Turning Diameter - Wall to Wall
|
N/A
Turning Diameter - Wall to Wall
|
|
15
Steering Ratio (:1), Overall
|
-
Steering Ratio (:1), Overall
|
24
Steering Ratio (:1), Overall
|
17
Steering Ratio (:1), Overall
|
Measurements
|
182 in
Length, Overall
|
-
Length, Overall
|
177 in
Length, Overall
|
201 in
Length, Overall
|
|
68 in
Width, Max w/o mirrors
|
-
Width, Max w/o mirrors
|
67 in
Width, Max w/o mirrors
|
72 in
Width, Max w/o mirrors
|
|
-
Cargo Volume to Seat 1
|
-
Cargo Volume to Seat 1
|
-
Cargo Volume to Seat 1
|
156 ft³
Cargo Volume to Seat 1
|
|
27 in
Liftover Height
|
-
Liftover Height
|
27 in
Liftover Height
|
25 in
Liftover Height
|
|
5
Passenger Capacity
|
-
Passenger Capacity
|
5
Passenger Capacity
|
7
Passenger Capacity
|
|
-
Rear Door Opening Height
|
-
Rear Door Opening Height
|
-
Rear Door Opening Height
|
41 in
Rear Door Opening Height
|
|
-
Third Hip Room
|
-
Third Hip Room
|
-
Third Hip Room
|
51 in
Third Hip Room
|
|
53 in
Height, Overall
|
-
Height, Overall
|
54 in
Height, Overall
|
68 in
Height, Overall
|
|
54 in
Front Shoulder Room
|
-
Front Shoulder Room
|
54 in
Front Shoulder Room
|
60 in
Front Shoulder Room
|
|
-
Third Leg Room
|
-
Third Leg Room
|
-
Third Leg Room
|
37 in
Third Leg Room
|
|
N/A
Min Ground Clearance
|
-
Min Ground Clearance
|
6 in
Min Ground Clearance
|
6 in
Min Ground Clearance
|
|
42 in
Front Leg Room
|
-
Front Leg Room
|
43 in
Front Leg Room
|
40 in
Front Leg Room
|
|
87 ft³
Passenger Volume
|
-
Passenger Volume
|
91 ft³
Passenger Volume
|
N/A
Passenger Volume
|
|
-
Cargo Volume to Seat 2
|
-
Cargo Volume to Seat 2
|
-
Cargo Volume to Seat 2
|
55 ft³
Cargo Volume to Seat 2
|
|
-
Cargo Volume to Seat 3
|
-
Cargo Volume to Seat 3
|
-
Cargo Volume to Seat 3
|
24 ft³
Cargo Volume to Seat 3
|
|
49 in
Front Hip Room
|
-
Front Hip Room
|
51 in
Front Hip Room
|
54 in
Front Hip Room
|
|
56 in
Track Width, Rear
|
-
Track Width, Rear
|
56 in
Track Width, Rear
|
63 in
Track Width, Rear
|
|
-
Cargo Area Length @ Floor to Seat 2
|
-
Cargo Area Length @ Floor to Seat 2
|
-
Cargo Area Length @ Floor to Seat 2
|
62 in
Cargo Area Length @ Floor to Seat 2
|
|
38 in
Front Head Room
|
-
Front Head Room
|
39 in
Front Head Room
|
40 in
Front Head Room
|
|
-
Cargo Box Width @ Wheelhousings
|
-
Cargo Box Width @ Wheelhousings
|
-
Cargo Box Width @ Wheelhousings
|
48 in
Cargo Box Width @ Wheelhousings
|
|
-
Cargo Area Length @ Floor to Seat 1
|
-
Cargo Area Length @ Floor to Seat 1
|
-
Cargo Area Length @ Floor to Seat 1
|
100 in
Cargo Area Length @ Floor to Seat 1
|
|
55 in
Second Shoulder Room
|
-
Second Shoulder Room
|
54 in
Second Shoulder Room
|
62 in
Second Shoulder Room
|
|
104 in
Wheelbase
|
-
Wheelbase
|
102 in
Wheelbase
|
120 in
Wheelbase
|
|
12 ft³
Trunk Volume
|
-
Trunk Volume
|
12 ft³
Trunk Volume
|
N/A
Trunk Volume
|
|
-
Third Head Room
|
-
Third Head Room
|
-
Third Head Room
|
39 in
Third Head Room
|
|
-
Cargo Box (Area) Height
|
-
Cargo Box (Area) Height
|
-
Cargo Box (Area) Height
|
45 in
Cargo Box (Area) Height
|
|
-
Third Shoulder Room
|
-
Third Shoulder Room
|
-
Third Shoulder Room
|
60 in
Third Shoulder Room
|
|
58 in
Track Width, Front
|
-
Track Width, Front
|
57 in
Track Width, Front
|
62 in
Track Width, Front
|
|
-
Cargo Area Width @ Beltline
|
-
Cargo Area Width @ Beltline
|
-
Cargo Area Width @ Beltline
|
52 in
Cargo Area Width @ Beltline
|
|
33 in
Second Leg Room
|
-
Second Leg Room
|
33 in
Second Leg Room
|
39 in
Second Leg Room
|
|
-
Rear Door Opening Width
|
-
Rear Door Opening Width
|
-
Rear Door Opening Width
|
51 in
Rear Door Opening Width
|
|
37 in
Second Head Room
|
-
Second Head Room
|
38 in
Second Head Room
|
39 in
Second Head Room
|
|
50 in
Second Hip Room
|
-
Second Hip Room
|
52 in
Second Hip Room
|
64 in
Second Hip Room
|
|
-
Cargo Area Length @ Floor to Seat 3
|
-
Cargo Area Length @ Floor to Seat 3
|
-
Cargo Area Length @ Floor to Seat 3
|
Not Available in
Cargo Area Length @ Floor to Seat 3
|
Weight & Capacity
|
Not Available lbs
Dead Weight Hitch - Max Trailer Wt.
|
-
Dead Weight Hitch - Max Trailer Wt.
|
1,000 lbs
Dead Weight Hitch - Max Trailer Wt.
|
2,000 lbs
Dead Weight Hitch - Max Trailer Wt.
|
|
14 gal
Fuel Tank Capacity, Approx
|
-
Fuel Tank Capacity, Approx
|
12 gal
Fuel Tank Capacity, Approx
|
26 gal
Fuel Tank Capacity, Approx
|
|
Not Available lbs
Dead Weight Hitch - Max Tongue Wt.
|
-
Dead Weight Hitch - Max Tongue Wt.
|
150 lbs
Dead Weight Hitch - Max Tongue Wt.
|
200 lbs
Dead Weight Hitch - Max Tongue Wt.
|
|
2,606 lbs
Base Curb Weight
|
-
Base Curb Weight
|
2,279 lbs
Base Curb Weight
|
3,948 lbs
Base Curb Weight
|
|
N/A
Wt Distributing Hitch - Max Tongue Wt.
|
-
Wt Distributing Hitch - Max Tongue Wt.
|
N/A
Wt Distributing Hitch - Max Tongue Wt.
|
200 lbs
Wt Distributing Hitch - Max Tongue Wt.
|
|
N/A
Wt Distributing Hitch - Max Trailer Wt.
|
-
Wt Distributing Hitch - Max Trailer Wt.
|
N/A
Wt Distributing Hitch - Max Trailer Wt.
|
2,000 lbs
Wt Distributing Hitch - Max Trailer Wt.
|
|
N/A
Aux Fuel Tank Capacity, Approx
|
-
Aux Fuel Tank Capacity, Approx
|
N/A
Aux Fuel Tank Capacity, Approx
|
N/A
Aux Fuel Tank Capacity, Approx
|
Electrical
|
N/A
Cold Cranking Amps @ 0° F (Primary)
|
-
Cold Cranking Amps @ 0° F (Primary)
|
525
Cold Cranking Amps @ 0° F (Primary)
|
N/A
Cold Cranking Amps @ 0° F (Primary)
|
|
105
Maximum Alternator Capacity (amps)
|
-
Maximum Alternator Capacity (amps)
|
90
Maximum Alternator Capacity (amps)
|
105
Maximum Alternator Capacity (amps)
|
Brakes
|
10.2 x -TBD- in
Front Brake Rotor Diam x Thickness
|
-
Front Brake Rotor Diam x Thickness
|
9.9 x 0.7 in
Front Brake Rotor Diam x Thickness
|
10.83 x 1.27 in
Front Brake Rotor Diam x Thickness
|
|
Power
Brake Type
|
-
Brake Type
|
Power
Brake Type
|
Pwr
Brake Type
|
|
Yes
Disc - Front (Yes or )
|
-
Disc - Front (Yes or )
|
Yes
Disc - Front (Yes or )
|
Yes
Disc - Front (Yes or )
|
|
Yes
Drum - Rear (Yes or )
|
-
Drum - Rear (Yes or )
|
Yes
Drum - Rear (Yes or )
|
Yes
Drum - Rear (Yes or )
|
|
N/A
Brake ABS System (Second Line)
|
-
Brake ABS System (Second Line)
|
N/A
Brake ABS System (Second Line)
|
N/A
Brake ABS System (Second Line)
|
|
4-Wheel
Brake ABS System
|
-
Brake ABS System
|
Not Available
Brake ABS System
|
4-Wheel
Brake ABS System
|
|
Not Available in
Rear Brake Rotor Diam x Thickness
|
-
Rear Brake Rotor Diam x Thickness
|
Not Available in
Rear Brake Rotor Diam x Thickness
|
Not Available in
Rear Brake Rotor Diam x Thickness
|
|
Not Available
Disc - Rear (Yes or )
|
-
Disc - Rear (Yes or )
|
Not Available
Disc - Rear (Yes or )
|
Not Available
Disc - Rear (Yes or )
|