




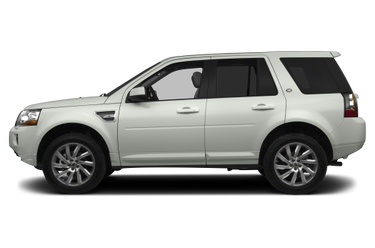
Land Rover LR2 vs. Land Rover LR3
Highlights
| 2015 Land Rover LR2 | 2009 Land Rover LR3 | |
|---|---|---|
| Starting MSRP |
$36,600
|
$45,975
|
| Towing Capacity |
2,000 lbs
|
N/A
|
| Cargo Capacity |
N/A
|
N/A
|
| Engine Type |
Intercooled Turbo Premium Unleaded I-4
|
Gas V8
|
| MPG |
17 City / 24 Hwy
|
12 City / 17 Hwy
|
| Horsepower |
240 hp
|
300 hp
|
| Drive Type |
Four Wheel Drive
|
All Wheel Drive
|
| Seating Capacity |
5
|
7
|
| Basic Warranty |
4 yr / 50,000 mi
|
4 yr / 50,000 mi
|
Engine
| 2015 Land Rover LR2 | 2009 Land Rover LR3 | |
|---|---|---|
| Engine Type |
Intercooled Turbo Premium Unleaded I-4
|
Gas V8
|
| Displacement |
2.0 L/122
|
4.4L/268
|
| SAE Net Horsepower @ RPM |
240 @ 5500
|
300 @ 5500
|
| SAE Net Torque @ RPM |
250 @ 1750
|
315 @ 4000
|
| Transmission Options |
|
|
| MPG |
17 City / 24 Hwy
|
12 City / 17 Hwy
|
| Total Cooling System Capacity |
N/A
|
N/A
|
Tires & Wheels
| 2015 Land Rover LR2 | 2009 Land Rover LR3 | |
|---|---|---|
| Front Tire Size |
P235/60VR18
|
255/55HR19
|
| Rear Tire Size |
P235/60VR18
|
255/55HR19
|
| Spare Tire Size |
Compact
|
175/80R19
|
| Front Wheel Size |
18 X 8 in
|
19 x 8 in
|
| Rear Wheel Size |
18 X 8 in
|
19 x 8 in
|
| Spare Wheel Size |
Compact in
|
19 x -TBD- in
|
| Front Wheel Material |
Aluminum
|
Alloy
|
| Rear Wheel Material |
Aluminum
|
Alloy
|
| Spare Wheel Material |
Steel
|
Steel
|
Suspension
| 2015 Land Rover LR2 | 2009 Land Rover LR3 | |
|---|---|---|
| Suspension Type - Front |
Strut
|
Independent, air
|
| Suspension Type - Rear |
Strut
|
Independent, air
|
| Suspension Type - Front (Cont.) |
Not available
|
Double-Wishbone
|
| Suspension Type - Rear (Cont.) |
Not available
|
Double-Wishbone
|
| Axle Type - Front |
Independent
|
Not available
|
| Axle Type - Rear |
Independent
|
Not available
|
Steering
| 2015 Land Rover LR2 | 2009 Land Rover LR3 | |
|---|---|---|
| Steering Type |
Rack-Pinion
|
Pwr Rack & Pinion
|
| Steering Ratio (:1), Overall |
N/A
|
N/A
|
| Lock to Lock Turns (Steering) |
Not available
|
3
|
| Turning Diameter - Curb to Curb |
37 ft
|
38 ft
|
| Turning Diameter - Wall to Wall |
N/A
|
N/A
|
Measurements
| 2015 Land Rover LR2 | 2009 Land Rover LR3 | |
|---|---|---|
| Second Hip Room |
N/A
|
N/A
|
| Passenger Capacity |
5
|
5
|
| Passenger Volume |
Not available
|
N/A
|
| Front Head Room |
40 in
|
40 in
|
| Front Leg Room |
39 in
|
42 in
|
| Front Shoulder Room |
58 in
|
59 in
|
| Front Hip Room |
N/A
|
N/A
|
| Second Head Room |
39 in
|
42 in
|
| Second Leg Room |
36 in
|
38 in
|
| Second Shoulder Room |
57 in
|
59 in
|
| Third Head Room |
Not available
|
Not Available in
|
| Third Leg Room |
Not available
|
Not Available in
|
| Third Shoulder Room |
Not available
|
Not Available in
|
| Third Hip Room |
Not available
|
N/A
|
| Wheelbase |
105 in
|
114 in
|
| Length, Overall |
177 in
|
191 in
|
| Width, Max w/o mirrors |
75 in
|
75 in
|
| Height, Overall |
69 in
|
75 in
|
| Track Width, Front |
63 in
|
63 in
|
| Track Width, Rear |
64 in
|
64 in
|
| Min Ground Clearance |
8 in
|
7 in
|
| Rear Door Opening Height |
N/A
|
N/A
|
| Rear Door Opening Width |
N/A
|
N/A
|
| Cargo Area Length @ Floor to Seat 1 |
62 in
|
77 in
|
| Cargo Area Length @ Floor to Seat 2 |
36 in
|
N/A
|
| Cargo Area Length @ Floor to Seat 3 |
N/A
|
Not Available in
|
| Cargo Area Width @ Beltline |
49 in
|
49 in
|
| Cargo Box Width @ Wheelhousings |
40 in
|
45 in
|
| Cargo Box (Area) Height |
35 in
|
N/A
|
| Liftover Height |
N/A
|
N/A
|
| Cargo Volume to Seat 1 |
59 ft³
|
90 ft³
|
| Cargo Volume to Seat 2 |
27 ft³
|
45 ft³
|
| Cargo Volume to Seat 3 |
N/A
|
Not Available ft³
|
| Length, Overall w/rear bumper |
N/A
|
Not available
|
| Overhang, Front |
N/A
|
Not available
|
| Overhang, Rear w/o bumper |
N/A
|
Not available
|
| Cab to End of Frame |
N/A
|
Not available
|
| Ground to Top of Load Floor |
N/A
|
Not available
|
| Ground Clearance, Front |
N/A
|
Not available
|
| Ground Clearance, Rear |
N/A
|
Not available
|
| Cargo Box Width @ Top, Rear |
N/A
|
Not available
|
| Cargo Box Width @ Floor |
N/A
|
Not available
|
| Tailgate Width |
N/A
|
Not available
|
| Cargo Volume |
N/A
|
Not available
|
| Ext'd Cab Cargo Volume |
N/A
|
Not available
|
Weight & Capacity
| 2015 Land Rover LR2 | 2009 Land Rover LR3 | |
|---|---|---|
| Base Curb Weight |
3,880 lbs
|
5,796 lbs
|
| Curb Weight - Front |
N/A
|
N/A
|
| Curb Weight - Rear |
N/A
|
N/A
|
| Maximum Payload Capacity |
N/A
|
N/A
|
| Dead Weight Hitch - Max Trailer Wt. |
2,000 lbs
|
1,654 lbs
|
| Dead Weight Hitch - Max Tongue Wt. |
200 lbs
|
551 lbs
|
| Wt Distributing Hitch - Max Trailer Wt. |
2,000 lbs
|
1,654 lbs
|
| Wt Distributing Hitch - Max Tongue Wt. |
200 lbs
|
551 lbs
|
| Maximum Trailering Capacity |
2,000 lbs
|
N/A
|
| Fuel Tank Capacity, Approx |
19 gal
|
23 gal
|
| Aux Fuel Tank Capacity, Approx |
N/A
|
N/A
|
| Curb Weight |
N/A
|
N/A
|
| Total Option Weight |
0 lbs
|
0 lbs
|
| Gross Axle Weight Rating |
5,880 lbs
|
Not available
|
| Gross Vehicle Weight Rating |
5,520 lbs
|
Not available
|
| Option Weight - Front |
0 lbs
|
Not available
|
| Option Weight - Rear |
0 lbs
|
Not available
|
| As Spec'd Curb Weight |
N/A
|
Not available
|
| As Spec'd Payload |
N/A
|
Not available
|
| Gross Combined Wt Rating |
N/A
|
Not available
|
| Fifth Wheel Hitch - Max Trailer Wt. |
N/A
|
Not available
|
| Fifth Wheel Hitch - Max Tongue Wt. |
N/A
|
Not available
|
Safety
| 2015 Land Rover LR2 | 2009 Land Rover LR3 | |
|---|---|---|
| Brake Assist |
Not available
|
Standard
|
| Stability Control |
Standard
|
Standard
|
Entertainment
| 2015 Land Rover LR2 | 2009 Land Rover LR3 | |
|---|---|---|
| Bluetooth® |
Standard
|
Optional
|
Electrical
| 2015 Land Rover LR2 | 2009 Land Rover LR3 | |
|---|---|---|
| Cold Cranking Amps @ 0° F (Primary) |
N/A
|
N/A
|
| Maximum Alternator Capacity (amps) |
N/A
|
N/A
|
Brakes
| 2015 Land Rover LR2 | 2009 Land Rover LR3 | |
|---|---|---|
| Brake Type |
4-Wheel Disc
|
Pwr
|
| Brake ABS System |
4-Wheel
|
Four-Wheel
|
| Brake ABS System (Second Line) |
4-Wheel
|
N/A
|
| Disc - Front (Yes or ) |
Yes
|
Yes
|
| Disc - Rear (Yes or ) |
Yes
|
Yes
|
| Front Brake Rotor Diam x Thickness |
13 in
|
13.3 x -TBD- in
|
| Rear Brake Rotor Diam x Thickness |
12 in
|
13.8 x -TBD- in
|
| Drum - Rear (Yes or ) |
Not Available
|
Not Available
|
FAQ
Which is more reliable, the 2015 Land Rover LR2 or the 2009 Land Rover LR3?
The 2009 Land Rover LR3 is more reliable than the 2015 Land Rover LR2 according to Cars.com consumers, with a reliability rating of 5.0 for the 2009 LR3 versus a reliability rating of 4.0 for the 2015 LR2.
Which is more fuel efficient, the 2015 Land Rover LR2 or the 2009 Land Rover LR3?
The 2015 Land Rover LR2 is more fuel efficient than the 2009 Land Rover LR3 with 20 MPG combined versus 14 MPG combined.
Which car is cheaper, the 2015 Land Rover LR2 or the 2009 Land Rover LR3?
The 2015 Land Rover LR2 is cheaper than the 2009 Land Rover LR3 with a $36,600 starting MSRP versus a $45,975 starting MSRP.
Similar cars for sale
-
Ford Expedition EL for sale
87 Great Deals out of 339 listings starting at $1,400
-
Hyundai Genesis for sale
50 Great Deals out of 205 listings starting at $2,999
-
INFINITI EX35 for sale
2 Great Deals out of 42 listings starting at $4,299
-
Land Rover LR4 for sale
46 Great Deals out of 166 listings starting at $4,950
-
Mercury Mountaineer for sale
5 Great Deals out of 23 listings starting at $1,995
-
Land Rover LR2 for sale
12 Great Deals out of 49 listings starting at $2,250