






Mercury Milan vs. Mercury Mountaineer

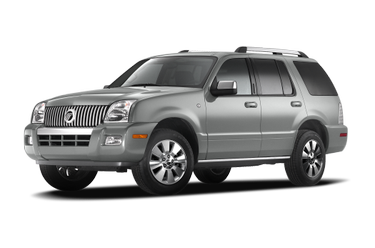
Highlights
| 2011 Mercury Milan | 2010 Mercury Mountaineer | |
|---|---|---|
| Starting MSRP |
$22,025
|
$29,480
|
| Engine Type |
Gas I4
|
Gas V6
|
| MPG |
23 City / 33 Hwy
|
14 City / 20 Hwy
|
| Horsepower |
175 hp
|
210 hp
|
| Drive Type |
Front Wheel Drive
|
Rear Wheel Drive
|
| Seating Capacity |
5
|
7
|
| Basic Warranty |
3 yr / 36,000 mi
|
3 yr / 36,000 mi
|
Engine
| 2011 Mercury Milan | 2010 Mercury Mountaineer | |
|---|---|---|
| Engine Type |
Gas I4
|
Gas V6
|
| Displacement |
2.5L/139
|
4.0L/245
|
| SAE Net Horsepower @ RPM |
175 @ 6000
|
210 @ 5100
|
| SAE Net Torque @ RPM |
172 @ 4500
|
254 @ 3700
|
| Transmission Options |
|
|
| MPG |
23 City / 33 Hwy
|
14 City / 20 Hwy
|
| Total Cooling System Capacity |
N/A
|
12.2 qts
|
Tires & Wheels
| 2011 Mercury Milan | 2010 Mercury Mountaineer | |
|---|---|---|
| Front Tire Size |
P205/60R16
|
P235/65R18
|
| Rear Tire Size |
P205/60R16
|
P235/65R18
|
| Spare Tire Size |
T145/80D16
|
P235/65R18
|
| Front Wheel Size |
16 x -TBD- in
|
18 x -TBD- in
|
| Rear Wheel Size |
16 x -TBD- in
|
18 x -TBD- in
|
| Spare Wheel Size |
16 x -TBD- in
|
18 x -TBD- in
|
| Front Wheel Material |
Aluminum
|
Aluminum
|
| Rear Wheel Material |
Aluminum
|
Aluminum
|
| Spare Wheel Material |
Steel
|
Steel
|
Suspension
| 2011 Mercury Milan | 2010 Mercury Mountaineer | |
|---|---|---|
| Suspension Type - Front |
Independent Short-Long Arm
|
Independent
|
| Suspension Type - Rear |
Independent Multi-Link
|
Independent
|
| Suspension Type - Front (Cont.) |
w/Coil Springs
|
w/Coil Springs
|
| Suspension Type - Rear (Cont.) |
w/Coil Springs
|
w/Coil Springs
|
Steering
| 2011 Mercury Milan | 2010 Mercury Mountaineer | |
|---|---|---|
| Steering Type |
Pwr Rack & Pinion
|
Variable Assist Pwr Rack & Pinion
|
| Steering Ratio (:1), Overall |
16
|
19
|
| Lock to Lock Turns (Steering) |
N/A
|
N/A
|
| Turning Diameter - Curb to Curb |
39 ft
|
37 ft
|
| Turning Diameter - Wall to Wall |
N/A
|
N/A
|
Measurements
| 2011 Mercury Milan | 2010 Mercury Mountaineer | |
|---|---|---|
| Passenger Capacity |
5
|
5
|
| Passenger Volume |
100 ft³
|
N/A
|
| Front Head Room |
39 in
|
40 in
|
| Front Leg Room |
42 in
|
42 in
|
| Front Shoulder Room |
57 in
|
59 in
|
| Front Hip Room |
54 in
|
55 in
|
| Second Head Room |
38 in
|
39 in
|
| Second Leg Room |
37 in
|
37 in
|
| Second Shoulder Room |
57 in
|
59 in
|
| Second Hip Room |
53 in
|
56 in
|
| Third Head Room |
Not available
|
Not Available in
|
| Third Leg Room |
Not available
|
Not Available in
|
| Third Shoulder Room |
Not available
|
Not Available in
|
| Third Hip Room |
Not available
|
Not Available in
|
| Wheelbase |
107 in
|
114 in
|
| Length, Overall |
189 in
|
194 in
|
| Width, Max w/o mirrors |
72 in
|
74 in
|
| Height, Overall |
57 in
|
73 in
|
| Track Width, Front |
62 in
|
61 in
|
| Track Width, Rear |
61 in
|
62 in
|
| Min Ground Clearance |
N/A
|
8 in
|
| Rear Door Opening Height |
Not available
|
N/A
|
| Rear Door Opening Width |
Not available
|
N/A
|
| Cargo Area Length @ Floor to Seat 1 |
Not available
|
N/A
|
| Cargo Area Length @ Floor to Seat 2 |
Not available
|
N/A
|
| Cargo Area Length @ Floor to Seat 3 |
Not available
|
N/A
|
| Cargo Area Width @ Beltline |
Not available
|
N/A
|
| Cargo Box Width @ Wheelhousings |
Not available
|
N/A
|
| Cargo Box (Area) Height |
Not available
|
N/A
|
| Liftover Height |
N/A
|
34 in
|
| Cargo Volume to Seat 1 |
Not available
|
86 ft³
|
| Cargo Volume to Seat 2 |
Not available
|
45 ft³
|
| Cargo Volume to Seat 3 |
Not available
|
Not Available ft³
|
| Trunk Volume |
17 ft³
|
N/A
|
Weight & Capacity
| 2011 Mercury Milan | 2010 Mercury Mountaineer | |
|---|---|---|
| Base Curb Weight |
3,365 lbs
|
4,525 lbs
|
| Dead Weight Hitch - Max Trailer Wt. |
N/A
|
3,500 lbs
|
| Dead Weight Hitch - Max Tongue Wt. |
N/A
|
350 lbs
|
| Wt Distributing Hitch - Max Trailer Wt. |
N/A
|
3,500 lbs
|
| Wt Distributing Hitch - Max Tongue Wt. |
N/A
|
525 lbs
|
| Fuel Tank Capacity, Approx |
18 gal
|
23 gal
|
| Aux Fuel Tank Capacity, Approx |
N/A
|
N/A
|
Safety
| 2011 Mercury Milan | 2010 Mercury Mountaineer | |
|---|---|---|
| Stability Control |
Standard
|
Standard
|
Electrical
| 2011 Mercury Milan | 2010 Mercury Mountaineer | |
|---|---|---|
| Cold Cranking Amps @ 0° F (Primary) |
N/A
|
650
|
| Maximum Alternator Capacity (amps) |
150
|
121
|
Brakes
| 2011 Mercury Milan | 2010 Mercury Mountaineer | |
|---|---|---|
| Brake Type |
Power
|
Pwr
|
| Brake ABS System |
4-Wheel
|
4-Wheel
|
| Brake ABS System (Second Line) |
N/A
|
N/A
|
| Disc - Front (Yes or ) |
Yes
|
Yes
|
| Disc - Rear (Yes or ) |
Yes
|
Yes
|
| Front Brake Rotor Diam x Thickness |
N/A
|
12.0 x -TBD- in
|
| Rear Brake Rotor Diam x Thickness |
N/A
|
11.9 x -TBD- in
|
| Drum - Rear (Yes or ) |
Not Available
|
Not Available
|
FAQ
Which is more reliable, the 2011 Mercury Milan or the 2010 Mercury Mountaineer?
The 2011 Mercury Milan is more reliable than the 2010 Mercury Mountaineer according to Cars.com consumers, with a reliability rating of 4.6 for the 2011 Milan versus a reliability rating of 4.2 for the 2010 Mountaineer.
Which is more fuel efficient, the 2011 Mercury Milan or the 2010 Mercury Mountaineer?
The 2011 Mercury Milan is more fuel efficient than the 2010 Mercury Mountaineer with 26 MPG combined versus 16 MPG combined.
Which car is cheaper, the 2011 Mercury Milan or the 2010 Mercury Mountaineer?
The 2011 Mercury Milan is cheaper than the 2010 Mercury Mountaineer with a $22,025 starting MSRP versus a $29,480 starting MSRP.
Similar cars for sale
-
Ford Fusion for sale
591 Great Deals out of 2603 listings
-
Mercury Mariner for sale
13 Great Deals out of 37 listings starting at $2,600
-
Mercury Mountaineer for sale
3 Great Deals out of 24 listings starting at $1,995
-
Ford Explorer Sport Trac for sale
24 Great Deals out of 121 listings starting at $1,299
-
Ford Explorer for sale
4581 Great Deals out of 18902 listings
-
Mercury Grand Marquis for sale
21 Great Deals out of 81 listings starting at $1,999
-
Mercury Milan for sale
11 Great Deals out of 42 listings starting at $1,943